
How to Install XAMPP for Windows
How to Install XAMPP for Windows XAMPP is a free and open-source cross-platform web server solution that includes Apache, MySQL (or MariaDB), PHP, and Perl. It is a simple and easy-to-install package that helps set up a local web development environment.
XAMPP: The Ultimate PHP Development Environment
XAMPP is one of the most popular software packages used to set up a local PHP development environment. It offers all the essential components needed for web services, making it ideal for transitioning projects from a local server to a live server with minimal configuration changes.
How to Install XAMPP for Windows
What is XAMPP?
XAMPP is a free, open-source software stack, which stands for:
- X (Cross-platform)
- A (Apache – Web Server)
- M (MySQL – Database)
- P (PHP – Server-side scripting language)
- P (Perl – High-level programming language)
In addition to these core components, XAMPP includes other administrative tools like:
- phpMyAdmin for database management
- FileZilla for FTP server functionality
- Mercury for email server management
- Tomcat for JSP development
This makes XAMPP a powerful, lightweight solution for full-stack web development.
Why Use XAMPP?
- Free and Cross-Platform: XAMPP is available for Windows, Linux, and macOS, making it accessible to developers on multiple platforms.
- Beginner-Friendly: With an easy installation process, it’s ideal for beginners looking to set up a full-stack web development environment.
- Open Source: XAMPP is open-source, ensuring developers can customize and modify it according to their needs.
- Lightweight and Simple: XAMPP provides a simple and fast setup, reducing time spent on configurations.
- Time-Saving: It automates many administrative tasks, such as checking the status of services and managing security settings.
- Efficient Deployment: Since most live servers use similar components to XAMPP, it ensures a smooth transition from a local server to production.
Components of XAMPP
1. Apache
- Role: Handles HTTP requests and serves web pages to users.
- Description: Apache is the world’s most widely used web server, maintained by the Apache Software Foundation. It’s essential for hosting websites and delivering content over the internet.
2. MySQL (or MariaDB)
- Role: Acts as the database management system.
- Description: MySQL helps store and manage data for web applications. It is an open-source database solution and is ideal for handling large amounts of data efficiently.
3. PHP
- Role: Powers server-side scripting.
- Description: PHP (Hypertext Preprocessor) is embedded within HTML and works seamlessly with Apache and MySQL, making it a favored choice for developing dynamic web applications.
4. Perl
- Role: High-level programming for web development and network programming.
- Description: Perl is used for various tasks like text processing and report generation. It adds versatility to XAMPP, especially for network-related projects.
5. phpMyAdmin
- Role: Web-based interface for database management.
- Description: This tool allows developers to easily interact with the MySQL database, create tables, run SQL queries, and manage data without using command-line tools.
6. FileZilla FTP Server
- Role: Provides FTP services.
- Description: FileZilla is integrated within XAMPP to handle file transfers, making it easier to manage uploads and server files remotely.
7. Mercury Mail Server
- Role: Provides email management.
- Description: Mercury helps send, receive, and manage emails during development, useful for testing email functionalities in web applications.
8. Tomcat Server
- Role: Runs Java Servlets and JSP (Java Server Pages).
- Description: Tomcat is included in XAMPP for developers building applications using Java-based technologies.
Advantages of XAMPP
- Ease of Use: Simple installation and configuration make XAMPP accessible to both beginners and experienced developers.
- Local Development: XAMPP allows developers to test PHP pages on a local server before deploying them to a live server.
- Cost-Effective: As an open-source solution, XAMPP is completely free, providing a robust environment for web development without licensing costs.
- Time-Saving: It comes pre-bundled with all the necessary software, so developers don’t have to install and configure individual components manually.
- Great for Development and Testing: XAMPP makes it easy to test, debug, and develop applications in a local environment without affecting the live server.
Similar Software Packages
Other software packages that serve as alternatives to XAMPP include:
- WAMP: A Windows-specific AMP stack.
- LAMP: A Linux-specific AMP stack.
- MAMP: Similar to XAMPP but tailored for macOS environments.
Here’s a step-by-step guide to installing XAMPP on a Windows PC: How to Install XAMPP for Windows
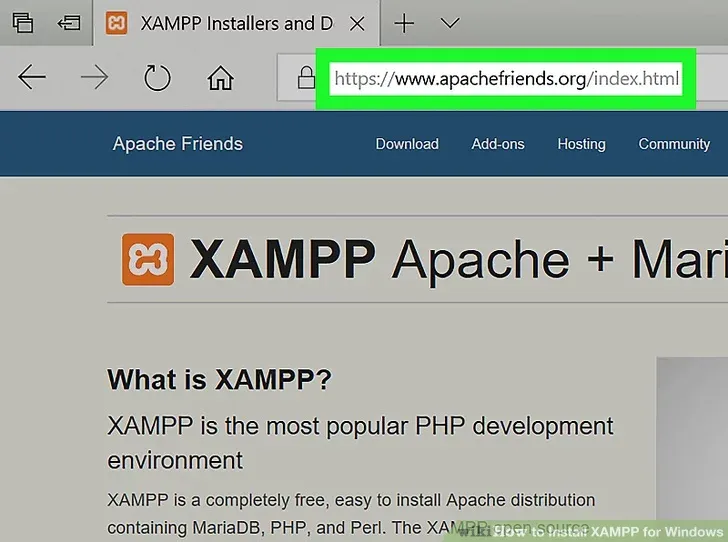
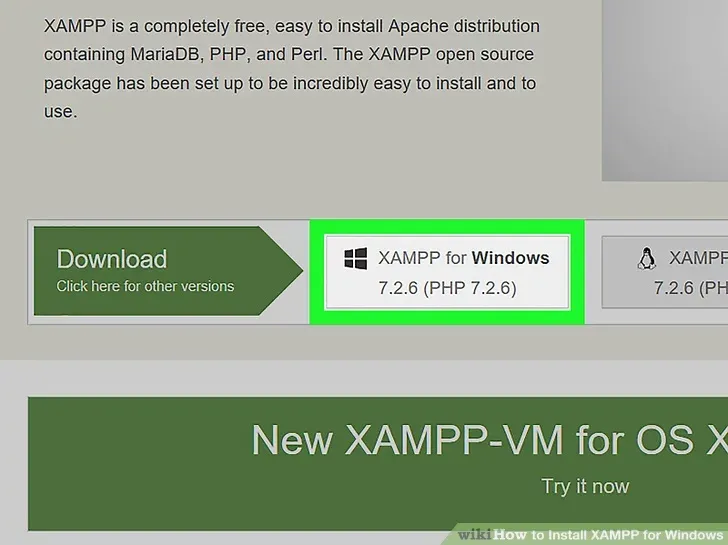
Step 1: Download XAMPP
- Visit the official XAMPP website: Apache Friends.
- On the homepage, click on the XAMPP for Windows download link.
- Choose the version of PHP that suits your needs (you can select the latest version).
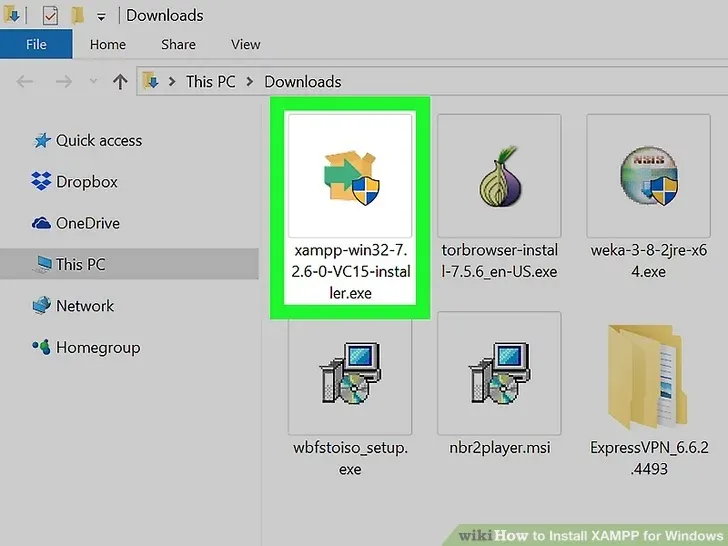
Step 2: Run the Installer
- Once the download is complete, open the installer file (usually named something like
xampp-windows-x64-x.x.x-installer.exe). - If you encounter a User Account Control (UAC) prompt, click Yes to allow the installer to make changes to your system.
Click Yes when prompted. This will open the XAMPP setup window.
- You may have to click OK on a warning if you have User Account Control (UAC) activated on your computer
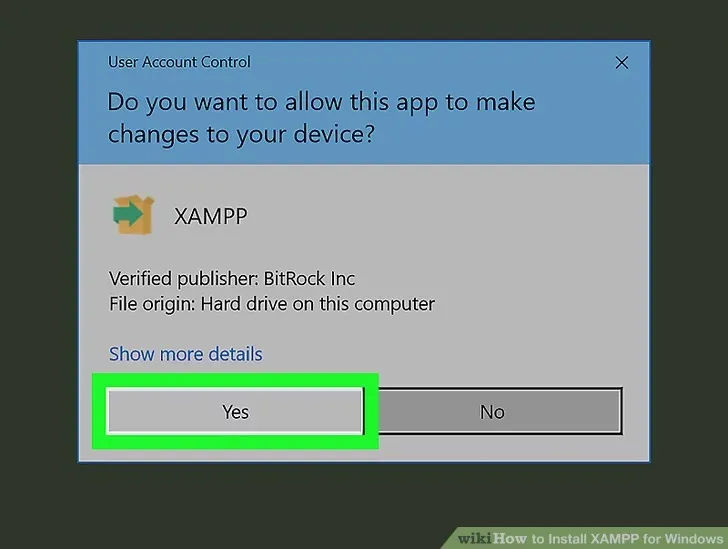
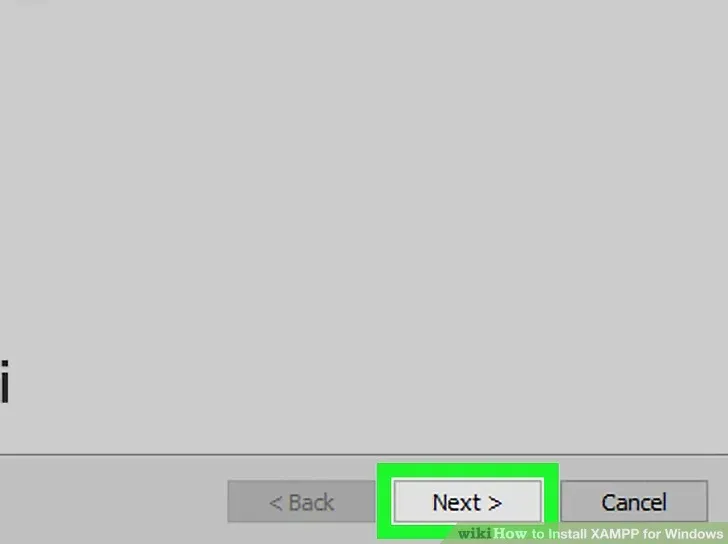
Click Next. It’s at the bottom of the setup window.
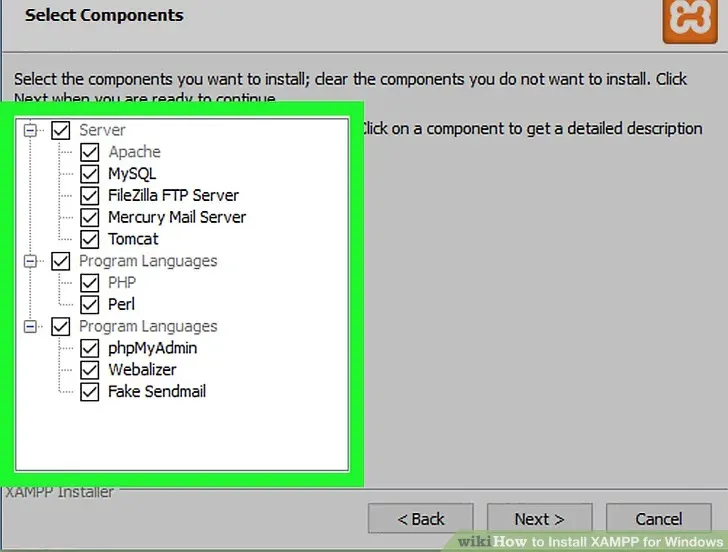
Step 3: Select Components
- A setup wizard will appear. Click Next to begin the installation process.
- You’ll be asked to select the components you want to install. By default, Apache, MySQL, PHP, and phpMyAdmin are selected. If you need others, such as Perl or an FTP server, you can check those boxes.
- Recommended components:
- Apache: Mandatory to run the web server.
- MySQL/MariaDB: Database management system.
- PHP: Server-side scripting language.
- phpMyAdmin: Tool to manage MySQL databases.
- Recommended components:
- Click Next once you’ve selected your components.
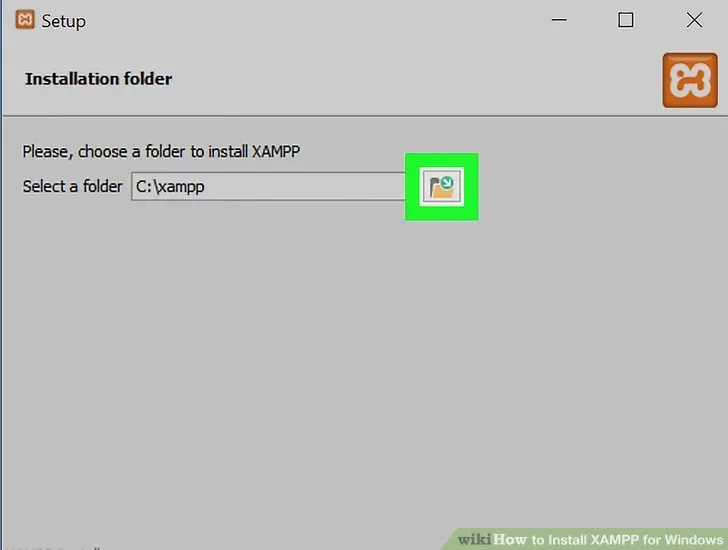
Step 4: Choose the Installation Folder
- By default, XAMPP installs in the
C:\xamppfolder. You can choose a different directory if you want, but it’s recommended to use the default. - Click Next to continue.
Step 5: Bitnami for XAMPP
- You’ll see an option to install Bitnami for XAMPP, which provides additional web applications. If you don’t need it, uncheck the box and click Next.

Step 6: Start the Installation
- After reviewing your selections, click Next to begin the installation process.
- The installer will copy files to your system, and this may take a few minutes.

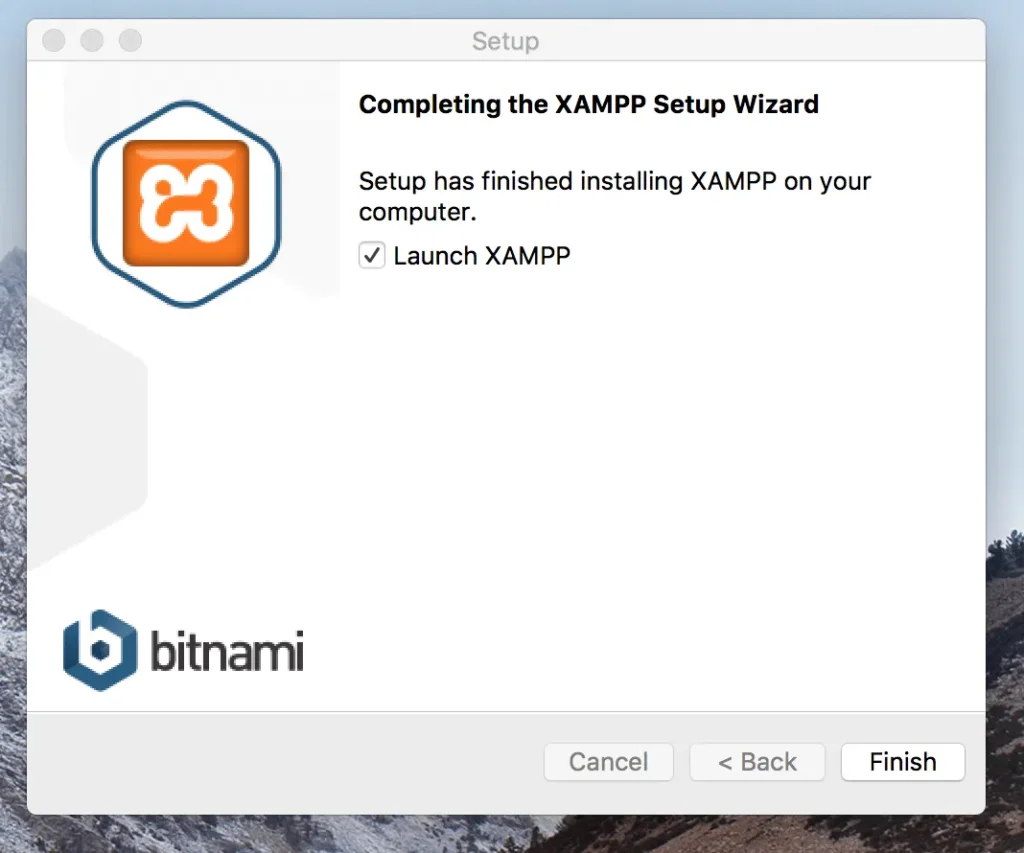
Step 7: Completing the Installation
- Once the installation is complete, you’ll see a screen asking if you want to start the XAMPP Control Panel. Keep the box checked and click Finish.
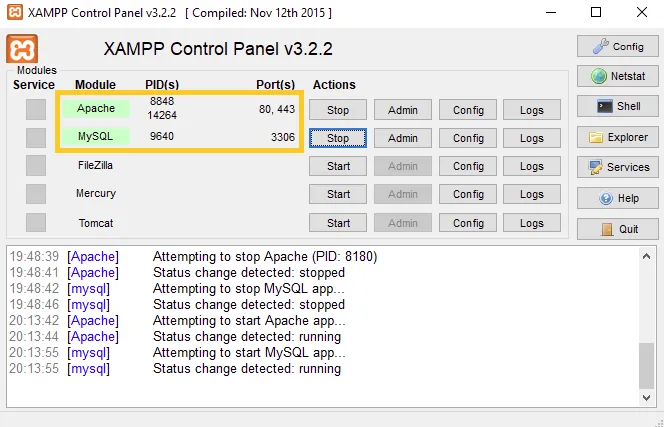
Step 8: Launch XAMPP Control Panel
- The XAMPP Control Panel should now be open. From here, you can start and stop individual services like Apache and MySQL.
- To start Apache, click Start next to Apache.
- To start MySQL, click Start next to MySQL.
- Once both services are running, you can open a web browser and type
http://localhost/to verify that your local server is working.
2 Comments-
-
How to install xampp on ubantu please help us.
Thanks for informing.